A look inside Wicks Forge: The "Goblin Workshop"
We’re not running a tech company that doesn’t need inventory to serve customers, and we definitely don’t have a factory overseas that runs machines and assembly lines for all of the heavy lifting.
With every sale made, another piece goes into the forge and a real, living, breathing human being needs to make dozens if not hundreds of hammer strikes before it’s ready to ship.
Our business of hand-forging pieces won't change, and there are only so many pieces our small team of blacksmiths can create in a day.
Whether we're making 1 piece or 100, the forging process is still the same.
So how do we manage to keep up?
Well, the game has been figuring out how we can increase production efficiency, while also maintaining the core principle of creating functional and affordable handmade pieces.
The process of creating a piece is similar to following a recipe. You begin with your ingredients–in our case a piece of steel of a certain dimension and length– then you follow a series of steps to go from starting material to finished product.
Hammer a point, forge a curl, bend in a vise, stamp with a press, cut off, clean with a grinder, drill a hole, polish, and apply a finishing solution, etc.
What we've tried to do over the years is find the absolute best and fastest way to carry out each of these steps to increase the number of pieces we can produce and keep prices affordable.
During our forging process, we use specialty tooling like jigs and dies to help us complete each step faster and more consistently. Once the piece is forged, we rely on more custom tools and processes to help us finish pieces better and faster.
Speeding up the finishing process means we can spend the majority of our time doing the one thing that no machine can replicate: hand-forging pieces.
By necessity (i.e. our small size, budget, and the fact that there are so few blacksmith shops and thus little demand for the type of equipment that would speed up our work) and by choice (because we love the DIY aesthetic) most of our tools and equipment are either completely homemade or heavily modified versions of tools originally made for different purposes.
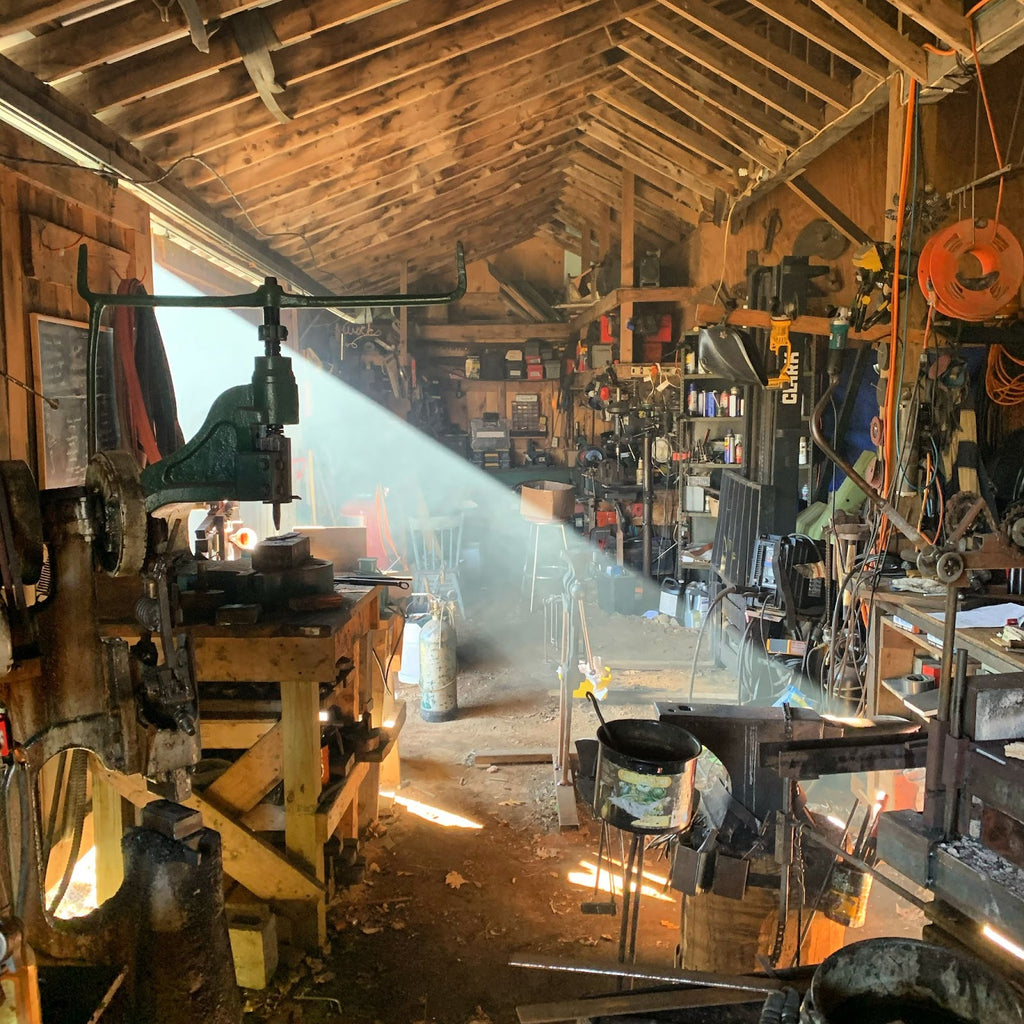
What this means is that, in contrast to our finished products which are clean and consistent, our workshop is full of oily equipment made of scrap metal and (in some cases literally) held together with duct tape and wire.
A friend of the shop refers to Wicks Forge as a "goblin workshop" because everything has a cobbled-together vibe like the goblin clans in The Lord of the Rings or something out of a Mad Max movie.
Rather than an embarrassment, these ugly pieces of equipment are some of our proudest creations. When I look at them I don't see Frankenstein's monster, I see all the costs we saved by making the equipment ourselves. I see the hours they save during production – savings we can then pass on to our customers.
And I love the story behind how each piece of equipment was made or found for a bargain on Craigslist. I see the life these tools had before they found their way into our shop and how their story grows with each piece they help make.
So today, I thought it would be fun to give you a little tour of our goblin workshop and share the story in parts.
Part 1: Tumbling through the years
When pieces are forged, the surface of the metal reacts with the heat from the forge and creates a scaly surface that must be removed before a finish can be applied.
A tumbler spins around with the pieces inside and removes this scale for us automatically.
Without these tumblers, we'd have to wire brush every single piece individually, adding hundreds of hours to our production process each year and driving up our prices significantly.
Homemade #1

This was a small guy and our first ever homemade machine
Starting Materials: scrap metal, plastic bucket, scrap motor
Cost: 30$ for drive belts
Homemade # 2 (full size)

Starting Materials: scrap metal, grandpa's broken air compressor for tank and motor
Cost: 50 $ for bearings, reused drive belts from #1
Homemade # 3 (extra large)

Starting Materials: scrap metal and new steel, salvaged pipe threader for motor
Cost: $700 for steel, bearings, drive chain, and sprockets.Homemade # 4 (tinny)

We use it to debur and clean copper pieces and jewelry.
Starting Materials: salvaged low speed motor, pasta strainer
Cost: freePart 2: Power up, Glow down
A few years ago we were expanding our product line to include larger pieces that needed an additional power hammer to help us work that thicker material efficiently.
A nice new power hammer can cost over $10k… definitely not an affordable choice.
In the middle of the pandemic, we found an off-brand hammer for sale for only 2k in Minnesota, so naturally, the guys and I rented a U-Haul and took a road trip out there to pick it up.
The hammer had barely been used but also didn't work very well because it was an off-brand hammer. But the great thing about working with metal is we can modify tools to suit our needs.
We upgraded the motor, adjusted the valving, raised the machine to save our backs while we worked, added a work table and tooling holder, built a series of custom dies for it, and it's been a champ for us for years now.
Here's the pretty before picture (gorgeous but not functional):

And the post-wicksforgerized set-up (horrendous-looking but amazingly functional):

Part 3: Squasher, squisher, crusher
The hydraulic press is used for all sorts of processes that require incredible amounts of controlled force. It was fun designing a hydraulic press to meet the needs of the shop, which involved figuring out how hydraulic systems even work to begin with.

Aside from the hydraulic components and the main ‘I’ beam (a Craigslist find), it’s made entirely from scrap metal given to us by Bradbury Metalworks.
We used old railroad tracks to mount the cylinder and make combination dies for the press and old agricultural mowing blades served as the ram slide.
At full power, the beast of a machine can generate 50,000 pounds of force. Quite the squasher!
Part 4: Get Jiggy with it
Jigs are tools that allow you to make bends or complete certain steps of a process consistently. These jigs, made of scrap metal, help us make everything from simple hooks and bottle openers to more complex shapes like hearts and cup-holders.

Part 5: Frankenstein wire wheel
Normal bench grinders stall when wire brushing larger pieces. Industrial bench grinders work better but are very expensive when purchased brand new and hard to find used.
So we got a handheld grinder with a very strong gearing mechanism meant for auto body work and modified it into our own supercharged bench grinder. The base was, of course, made of scrap metal.

Part 6: Ice-cold rebar cut-off tool
When it is time to cut a piece of metal during the forging process, the usual technique would be to heat the metal back up in the forge and then cut it with a cut-off tool on the anvil.

The problem with this process is that the piece needs to be hot to do so and the extra hammering can create unwanted distortions in the piece you've been working.
This yellow guy is a tool meant for cutting rebar on a job site and can do so when the metal is cold. We modified it to fit on a work table next to the forging area where it can be operated with a foot pedal, so we can cut pieces during the forging process without ever having to reheat them.

The length of time between when a piece is taken out of the forge and worked before it gets too cold and must be reheated is called "a heat." You can break down any piece by the number of "heats" it takes to make.
This ugly little guy has been our favorite new tool for months now because it's been saving us a heat per piece (which adds up fast when you’re making 100's of pieces a day).
Part 7: Pour one out for the Bar-tap-handle-belt-grinder
We don't do much knifemaking here, but we do use these grinders every day to clean our steel and to grind edges into our letter openers.
A new belt grinder can cost over $2,000, but these were both homemade for about a quarter of the cost.

The one on the right was made by a local knifemaker years ago and found its way into our shop (where we made additional modifications to it, obviously).
The beer tap handles were his original design. Use what you got…
Final thoughts
While the Wicks Forge shop may not be pretty to most, for us it represents all of the hard work, ingenuity, and creativity that we put into every piece.
Medieval blacksmiths made all of their tools by hand. We like to think of this as a modern-day/bootleg version of that. What can we say, we’re staying true to our roots.
But honestly, we wouldn’t be able to share our products with so many people if we weren’t willing to scour Craigslist for the right equipment (at the right price), just as we wouldn’t be able to develop the unique items that we do if we didn’t get creative with our tools every once in a while.
The tools and machinery we have in the shop are all a part of the Wicks Forge story— beautiful pieces at affordable prices, brought to you by not so beautiful, but still affordable, equipment and tools.
And we are so happy to be sharing this story with you.
I have two of your letter openers and a pair of bookends, and I love them! I use the letter openers multiple times a day and they bring a little happy to an otherwise mundane task. I think your goblin workshop is amazing! Congrats to a successful year, and blessings for 2023 and many many more!
This is a great start to the new novel “The Lord of the Forge”… And don’t forget all the wonderful repurposed tools in the finish/shipping area :)
Be back soon-
V